Overview
In the following post we’re going to cover the procedure how to secure Nginx with Let’s Encrypt SSL on Debian 10 machine(This procedure can be applied on Debian 11 as well). The post will showcase the scenario, where we need to install certbot on our Debian machine and obtain the SSL certificate from Let’s Encrypt, setup the automatic HTTPS redirection and test out the certificate renewal as well. Here we already have a Debian machine with Nginx preinstalled on which we’re going to go through the steps on how to secure nginx with let’s encrypt ssl.
Small note worth mentioning - Let’s encrypt isn’t the only free option to use. Cloudflare has the same option to provide free SSL’s and can be used to secure your Nginx website as well. If you’re interested in this option, you can check out the post on this link.
Requirements
1.. Registered and valid a domain name pointing to your Debian server.
2.. Debian 10 server(or Debian 11 server)
3.. Nginx web server installed and running
4.. Firewall configuration(open HTTP and HTTPS ports)
If you have UFW or IPTABLES firewall, you need to configure them to have them open ports 80 and 443 for HTTP and HTTPS in order not only to host your website
UFW
sudo ufw allow http
sudo ufw allow https
IPTABLES
sudo iptables -I INPUT -p tcp -m tcp --dport 80 -j ACCEPT

sudo iptables -I INPUT -p tcp -m tcp --dport 443 -j ACCEPT

or

sudo iptables -A INPUT -p tcp -m tcp --dport 80 -j ACCEPT

sudo iptables -I INPUT -p tcp -m tcp --dport 443 -j ACCEPT
How to Secure Nginx with Let’s Encrypt SSL on Debian
Certbot installation
We’ll be using the Let’s Encrypt tool Cerbot in order to obtain the SSL certificate and the Nginx plugin for certbot as well. Both tools will help us to obtain the certificate very easily, quick and also make the necessary configuration changes on Nginx. On top of that, the tools have the automation features, so upon SSL expiry, they can renew and install the certificate again.
sudo apt install certbot python3-certbot-nginx
Acquire the SSL certificate from Let’s Encrypt
Once you have confirmed that ports on firewall are opened and you finished with the certbot installation. To acquire the SSL certificate from Let’s encrypt we just need to run on command:
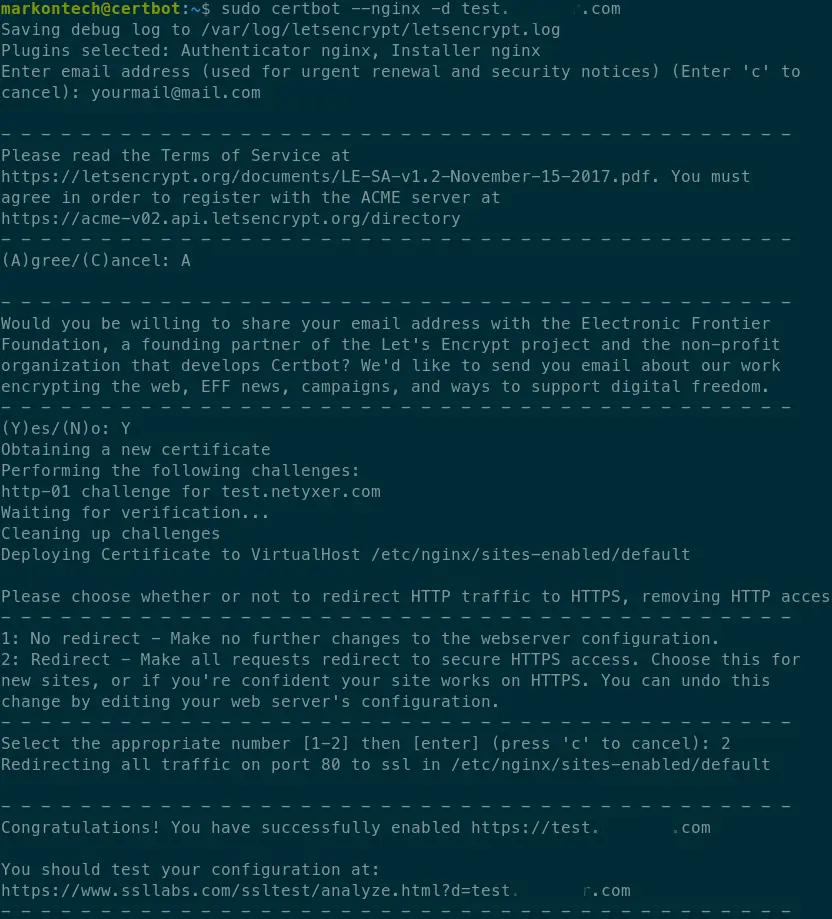
sudo certbot --nginx -d yourdomain.com
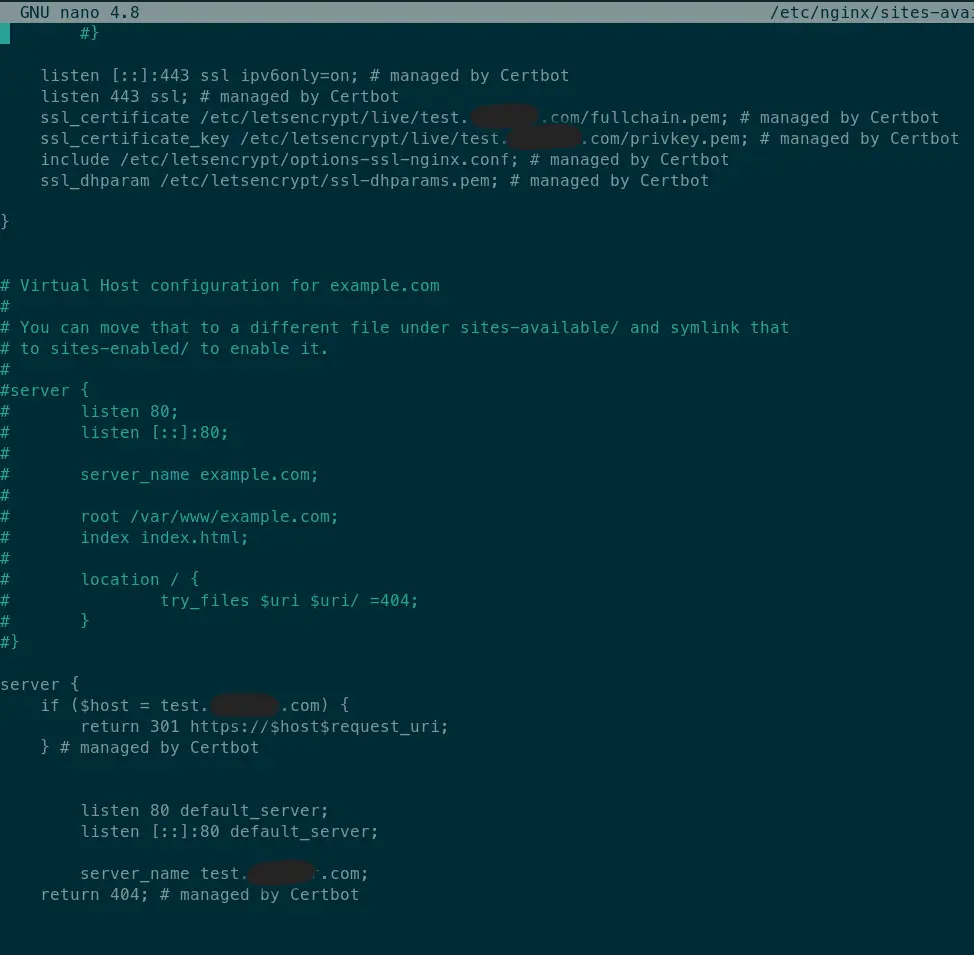
One note - before running the command, first it’s needed to in your nginx configuration file, write at the server_name parameter the actual domain name you pointed to your server. Certbot will look in your server block configuration that parameter and create the let’s encrypt configuration files according that parameter. Example in a picture bellow:
sudo nano /etc/nginx/sites-available/example.com

When you run this command, the certbot wizard will start. If you’re running the cerbot the first time, it will first ask to provide an email address to use as a contact and to agree to the Let’s encrypt’s license terms.
After that, it will run the http challenge, obtain the certificate and at the end it will ask you do you want it to configure right away the https redirection, which is also a good option.
As soon as the redirection configuration is completed, the new domain with SSL certificate should work right away.
Setup and test the automatic renewal
Let’s encrypt certificates are by default vaild for three months and the cerbot’s automated renewal is configured to renews the certificate at least once, when the certificate has less than 30 days of validity. Once the the SSL certificate is acquired, valid and active, double if the certbot’s timer service is active and running and test the renewal process with dry run option:
sudo systemctl status certbot.timer
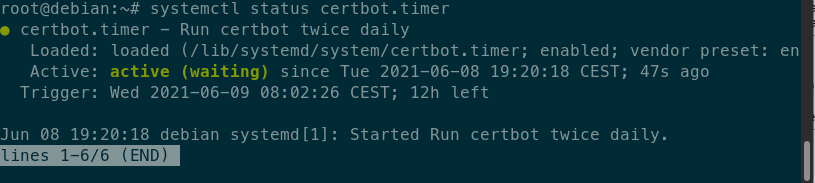
sudo certbot renew --dry-run
Check the Nginx configuration
You can double check the nginx configuration if the cerbot has successfully written the config for ssl certificates and for HTTPS redirection. Cerbot will restart the nginx once it’f finished with config you should have your domain/website secured and running with the active SSL.
Summary
To summarize, we went through the steps how to secure Nginx with Let’s Encrypt SSL on Debian 10 machine and on Debian 11 machine as well. We used let’s encrypt’s certbot tool for SSL certificate requests and it’s automatic renewal. Thankfully to certbot and it’s nginx plugin the process is really simple and straightforward and quick to complete. One suggestion on this is - it would be a good option to have a backup of let’s encrypt folder and to have it frequently backed up(as certbot itself has suggested). This is of course optional and it depends on how have you set the frequency of certificate renewals.
Let’s encrypt service, even though free and very popular among the tech world, it is a good option to secure some types of websites. Although, their free certificates are not recommended to use on e-commerce web sites for an example or any type of site that needs to pass and store very sensitive data(credit cards and similar). That’s why by default it’s recommended to have a short renewal time for SSL certificates.
Thank you for your time…