Overview
This article will showcase the procedure how to install Wireguard VPN server with Docker. In another words, we’ll deploy Wireguard container(as a Docker container) on our host macine.Wireguard is another good VPN option besides OpenVPN. Wireguard doesn’t have an official Docker image yet, so we’ll be using the Docker Wireguard image from linuxserver.io - This exact image used in this post: Docker Hub (and Github page)
This procedure is also covered with OpenVPN. You can check it out on this post.
Requirements:
- Docker installed and running.
For docker installation, you can refer to this post or check out the official documentation.
If you run distros such as - Ubuntu, Debian, Raspbian, then you can use the official Docker quick install script:
curl -fsSL https://get.docker.com -o get-docker.sh
sudo sh get-docker.sh
Then add user to the docker group, if you want. That is if you want to run docker commands without sudo.
sudo usermod -aG docker <username>
Firewall configuration
If you have a firewall running(which is highly recommended), it’s necessary to have open ports for Wireguard, otherwise, you’re not going to be able to establish the connection with the Wireguard server.
UFW
sudo ufw allow 51820
IPTABLES
sudo iptables -I INPUT -p tcp -m tcp --dport 51820 -j ACCEPT

or

sudo iptables -A INPUT -p tcp -m tcp --dport 51820 -j ACCEPT
How to Install Wireguard VPN server with Docker
Install and run the Wireguard container
Bellow is listed the command to deploy the Docker Wireguard container with environment variables set(these are examples and are explained as well):
docker run -d \
--name wireguard \
--cap-add=NET_ADMIN \
--cap-add=SYS_MODULE \
-e PUID=1000 -e PGID=1000 \
-e TZ=Europe/London \
-e SERVERURL=wireguard.yourdomain.com \
-e PEERS=laptop,tablet,phone \
-e PEERDNS=auto \
-p 51820:51820/udp \
-v wireguard_config:/config \
-v /lib/modules:/lib/modules \
--sysctl="net.ipv4.conf.all.src_valid_mark=1" \
--restart=unless-stopped \
linuxserver/wireguard

Environment variables explained:
name wireguard - this is the name we set for the wireguard container
cap-add=NET_ADMIN & cap-add=SYS_MODULE - this variable will provide the container elevated permissions on the host server and allow it to manage the host’s kernel and interact with the host’s network interfaces(which are necessary if we want to establish the communication to our VPN).
e PUID=1000 -e PGID=1000 - variable to specify the user and permission group(the same group as a sudo user)
e TZ=Europe/London - Timezone of the server(Set this accordingly)
e SERVERURL=vpn.yourdomain.com - Domain name(FQDN) of the server. Domain is optional but at least the public IP address of the server MUST be set(This necessary, so that our client device can locate the server and communicate with it). You can also set the configuration at auto.
e PEERS=laptop,tablet,phone - variable to configure client connection to the VPN for client devices(Essentially the number of client devices)
e PEERDNS=auto - Variable to configure the domain resolver
p 51820:51820/udp - port to expose on container and which port to listen on the host server to use for VPN traffic.
v wireguard_config:/config & v /lib/modules:/lib/modules - volume directories to mount on the host server and to use those to save the Wireguard configuration and files
sysctl=“net.ipv4.conf.all.src_valid_mark=1” - Another important variable. It’s to enable a kernel parameter on the network level so that the container can communicate with networks outside of the container. Meaning, that the container can gain internet access.
restart=unless-stopped - to restart the container every time it has stopped
linuxserver/wireguard - Docker image to use
Composer version
Note - this requires to have docker-compose installed and running
version: "2.1"
services:
wireguard:
image: linuxserver/wireguard
container_name: wireguard
cap_add:
- NET_ADMIN
- SYS_MODULE
environment:
- PUID=1000
- PGID=1000
- TZ=Europe/London
- SERVERURL=vpn.domain.com # domain optional, public IP is required at least
- SERVERPORT=51820
- PEERS=3 # number of peers
- PEERDNS=auto #optional
volumes:
- /lib/config:/config
- /lib/modules:/lib/modules
ports:
- 51820:51820/udp
sysctls:
- net.ipv4.conf.all.src_valid_mark=1
restart: unless-stopped
Connecting clients
Reviewing the peer configuration
As soon as you start the Wireguard container, the Wireguard will create all client connection configuration. You can review the configuration with the command:
docker logs wireguard
or
docker exec -it wireguard /app/show-peer peer-number
This output will also print out the QR codes as well for easy and quick connection setup. This is most convenient for smart devices that can scan the QR codes via Wireguard app. So, for smart devices, just download the Wireguard app, scan the QR code and you should be to connect right away.

Installing the Wireguard client and obtaining the peer configuration
On Linux devices(PCs and laptops), the client setup is a bit different. Client installation and configuration is all done via terminal. First, Wireguard install:
sudo apt install wireguard
Wireguard client is also available for other distributions and for Windows as well. If you need client for other clients, check out the docs.
Next, create the Wireguard interface:
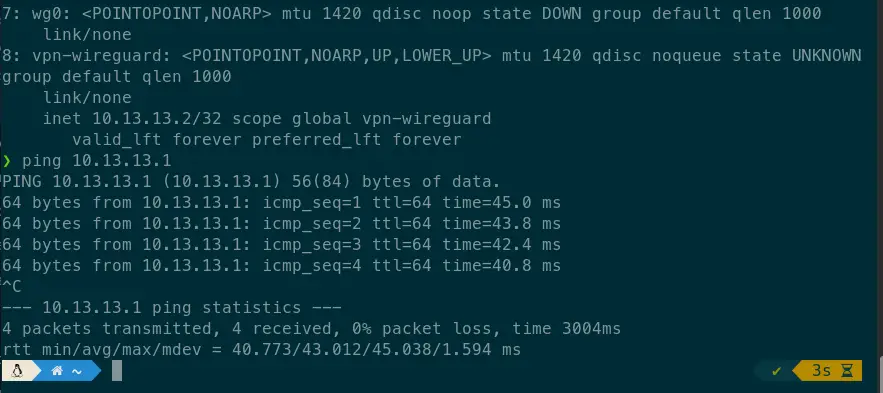
ip link add dev wg0 type wireguard
and double check if it’s present via command: ip -a. If you encounter issues with this, wireguard docs has other methods as well and covered troubleshooting.
It should look something like this:

Leave it as is for now and move on the server. We need to acquire the peer configuration directly from the server first, copy the configuration and paste it on our linux client device.
The default location of the peer configuration is located at:
/var/lib/docker/volumes/wireguard_config/_data/
You can copy it(if necessary) to backup it or access the peer configuration directly:
sudo cp /var/lib/docker/volumes/wireguard_config/_data/peer*/*.conf ~
This will copy all the peer configurations to the home directory and then on the home directory print the file with cat:
sudo cat peer_laptop.conf

or

sudo nano peer_laptop.conf
or access the peer configuration directly:
sudo cat /var/lib/docker/volumes/wireguard_config/_data/peer_laptop/peer_laptop.conf
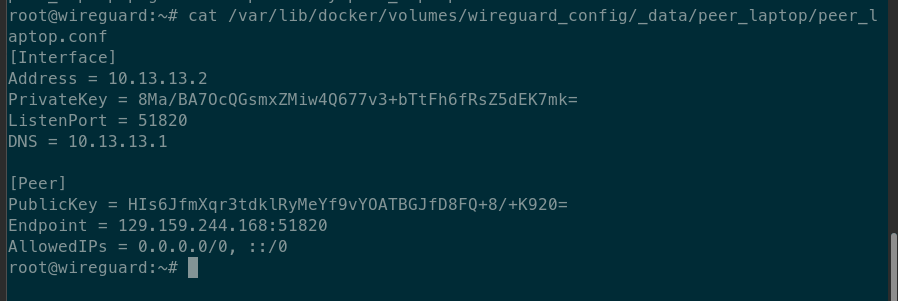
If you get the permission denied error with sudo command as well, that means the configuration can be accessed only as root. If that’s the case, then just login as root with - sudo su and again run either of the commands from before without sudo.
Configuring the client interface and establishing the connection
After you have copied the configuration, return to your linux device, create the peer configuration file(just for the example we’re going to create the config at home directory):
sudo nano wireguard-vpn.conf
and paste in the peer config, save and exit.
Lastly run this command to autoconfigure the wireguard interface, to activate it and after that, it should automatically connect to your server:
sudo wg-quick up wireguard-vpn.conf
You can double check it with - ip a and with ping to the vpn server or with a what’s my ip service.
To disconnect, just run the same command again but with down argument:
sudo wg-quick down wireguard-vpn.conf
Summary
To summarize what we covered in this post - the steps how to install Wireguard VPN server with Docker. On our host machine, we deployed the Docker Wireguard container and setup the Wireguard container to act as the main VPN server. We also showcased how to install the Wireguard client, create client profiles and establish the connection to the Wireguard server.
This method is rather quick to setup and it’s easily adjustable, if you want to like add or remove clients. But, If you prefer more the solution with OpenVPN, there’s the same procedure with OpenVPN on this link
Thank you very much for your time…